Outdoor LED lighting project

ddrueding

Fixture
Joined
Feb 4, 2002
Messages
19,729
Location
Horsens, Denmark
I'm imagining this to mostly be a dialogue between JTR and I, but all input is welcome. It will probably conclude with me having JTR build something for me as he has in the past (happy customer).

The outdoor wall lights are already installed and are 5000k (Lumark Crosstour), I'd like the ground lights to match. The goal is to make "up-lights", where the fixture is underground and light is emitted upwards through an opening at the surface.

At the moment I'm planning on the body of the fixtures to be made from copper/brass plumbing parts:

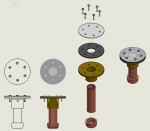
(from bottom to top) cap, male/male coupler, flange, gasket, glass. Somewhere in there I'd need to sneak in the wire. Probably put some desiccant at the bottom to discourage fogging. I know plumbing is good at being waterproof, and I was thinking that brass fittings would also be good at dissipating the heat of the unit. I'm in the process of drawing this up in SolidWorks to clarify the idea.

Now for the challenging bits:

1. I want to be able to control a chain of these lights together.
2. I want the chain to be quite long (15' with 5 units primarily, but another that is 50'+ and 15 units would be awesome)
3. The wire itself is going to be laid under some bark (not even buried), so low-voltage is a must.
4. The control unit should support being dimmed from a standard wall dimmer.

And the easy bits:

1. I can give exact wire lengths so calculations and connections can be made in advance.
2. Brightness does not need to be high.

Thoughts? Thanks!
 

ddrueding

Fixture
Joined
Feb 4, 2002
Messages
19,729
Location
Horsens, Denmark
Uplight-Assembly.png

SolidWorks is so much fun to screw around with. No dimensions given as I drew up the components myself without referencing the real thing, but it should work for the purpose of this discussion. The two dimensions that matter the most would be the pipe diameter and pipe length.
 

jtr1962

Storage? I am Storage!
Joined
Jan 25, 2002
Messages
4,374
Location
Flushing, New York
One issue I'm seeing with your idea is physically mounting the LED into the finished assembly. It's a long way down that pipe without much room to work with. And it's hard/impossible to see what's going on at the bottom while you're putting the LED in. You need a platform of some sort closer to the top of the assembly, ideally maybe 0.5" to 0.75" below the top (less if you don't plan to use an optic to focus the the light upwards). I personally don't see the need for an optic here as you want to be able to see light even if you're way off axis from the fixture.

Incidentally, I made a fountain light for my brother by mounting LEDs in caps just like the ones you plan to use, drilling two small holes barely large enough to put the wires through, and filling the entire thing with clear epoxy resin. It all worked for a while but the LEDs went dim. I suspect it was on account of ripple issues in the driver but I'll know for sure once I examine it.

As for dimmability and putting the LEDs in strings of 5 or 15, the former isn't a problem (the ballast we used for your chandelier will do). The latter shouldn't be, either. We just need to find a ballast which can go up to 45-50V. Incidentally, 48 VDC or less is considered "low-voltage" wiring in most places. That should probably be enough to accomodate 15 LEDs in series. You also need isolation if you plan to run the wiring underground, but most dimming drivers provide that.

As for getting the wires out without letting moisture in, one solution might be to partially fill the pipe with epoxy. You can mount the LED on the aforementioned platform close to the top, but have the wires coming out of two holes barely large enough for them in the cap at the bottom. Fill the pipe with an inch or two of epoxy and this should provide a watertight seal.

Because you don't need super high brightness, I doubt this will have any heat issues. Better LEDs these days convert 40% to 50% of their input power to light. Even if you drive the LEDs at 1 amp (i.e. a lot of light), that's maybe only 2 watts of heat to get rid of. The ground is a great heat sink. Remember the ground is used as a heat sink in geothermal heating/cooling.
 

ddrueding

Fixture
Joined
Feb 4, 2002
Messages
19,729
Location
Horsens, Denmark

That, with 5000k LEDs and dim-able from a regular wall dimmer. I could buy those just to use the enclosure, but it would be about twice as expensive as using threaded pipe components and 4x as expensive as doing the soldering myself.

I'm tempted to use the threaded cast brass parts to make accessing the internals easier.
 

ddrueding

Fixture
Joined
Feb 4, 2002
Messages
19,729
Location
Horsens, Denmark
One issue I'm seeing with your idea is physically mounting the LED into the finished assembly. It's a long way down that pipe without much room to work with. And it's hard/impossible to see what's going on at the bottom while you're putting the LED in. You need a platform of some sort closer to the top of the assembly, ideally maybe 0.5" to 0.75" below the top (less if you don't plan to use an optic to focus the the light upwards). I personally don't see the need for an optic here as you want to be able to see light even if you're way off axis from the fixture.

My thought was to solder a brace across the pipe section near one end to mount the LED to. One of the thoughts for making it so long was to add to the heat dissipation capabilities. If that isn't an issue I can get just enough pipe to connect the flange and cap to.

Incidentally, I made a fountain light for my brother by mounting LEDs in caps just like the ones you plan to use, drilling two small holes barely large enough to put the wires through, and filling the entire thing with clear epoxy resin. It all worked for a while but the LEDs went dim. I suspect it was on account of ripple issues in the driver but I'll know for sure once I examine it.

As for getting the wires out without letting moisture in, one solution might be to partially fill the pipe with epoxy. You can mount the LED on the aforementioned platform close to the top, but have the wires coming out of two holes barely large enough for them in the cap at the bottom. Fill the pipe with an inch or two of epoxy and this should provide a watertight seal.

I was thinking about sneaking the wire in through the gasket. The wire will be running near the surface, so sending it down the side of the body towards potentially wet soil seemed suboptimal.

As for dimmability and putting the LEDs in strings of 5 or 15, the former isn't a problem (the ballast we used for your chandelier will do). The latter shouldn't be, either. We just need to find a ballast which can go up to 45-50V. Incidentally, 48 VDC or less is considered "low-voltage" wiring in most places. That should probably be enough to accomodate 15 LEDs in series. You also need isolation if you plan to run the wiring underground, but most dimming drivers provide that.

So you don't see the wire length as an issue? How about longer distances? 120'?

Because you don't need super high brightness, I doubt this will have any heat issues. Better LEDs these days convert 40% to 50% of their input power to light. Even if you drive the LEDs at 1 amp (i.e. a lot of light), that's maybe only 2 watts of heat to get rid of. The ground is a great heat sink. Remember the ground is used as a heat sink in geothermal heating/cooling.

Perfect. So single LEDs should be enough? Or are we looking at arrays? What diameter of pipe will I need to make sure it fits?
 

jtr1962

Storage? I am Storage!
Joined
Jan 25, 2002
Messages
4,374
Location
Flushing, New York
My thought was to solder a brace across the pipe section near one end to mount the LED to. One of the thoughts for making it so long was to add to the heat dissipation capabilities. If that isn't an issue I can get just enough pipe to connect the flange and cap to.
A brace soldered to the pipe is fine both mechanically and thermally. The long pipe is good because it adds stability when buried and also increases heat dissipation abilities a bit.

I was thinking about sneaking the wire in through the gasket. The wire will be running near the surface, so sending it down the side of the body towards potentially wet soil seemed suboptimal.
The main issue I'm seeing with that is the fact the one side of the wire will be against bare metal (and hence not have a tight seal). Believe me, moisture will find its way in, even with 0.001" space under the wire, due to capillary action.

So you don't see the wire length as an issue? How about longer distances? 120'?
You'll need to use pretty heavy wire for mechanical strength here. Given that, the resistance is a non-issue. Remember most LED drivers are constant current circuits. They'll just increase voltage to compensate for any resistance losses in the wire. At the currents we're talking about, I'd be surprised if 120' of wiring added more than an extra volt. You can see some wire resistances for various gauges of wire here. For this project I might recommend at least 14 gauge wire. 120' of 14 gauge wire only has about 0.3 ohms of resistance. At 1 amp current, that's a mere 0.3 volts drop across the wiring.

Perfect. So single LEDs should be enough? Or are we looking at arrays? What diameter of pipe will I need to make sure it fits?
Given the amount of light you need efficient single LEDs like the Cree XP-G or XP-G2 are fine. You can get in excess of 200 lumens from these LEDs at 500 to 600 mA. That's probably more than you'll need.
 

ddrueding

Fixture
Joined
Feb 4, 2002
Messages
19,729
Location
Horsens, Denmark
So shipping the pipe and wire would probably be costly, and it doesn't sound like tuning the system to the wire length would be as big an issue as I was anticipating.

Does it sound feasible to have you build the LED units and the driver unit, then have me do assembly here?

The XP-G2 has a width of 3.30+/-.13
3.43mm is 0.135"
0.191" on the diagonal

Not sure what kind of packaging you are planning, but could it really fit inside a 0.25" pipe? That would be awesome.
 

jtr1962

Storage? I am Storage!
Joined
Jan 25, 2002
Messages
4,374
Location
Flushing, New York
So shipping the pipe and wire would probably be costly, and it doesn't sound like tuning the system to the wire length would be as big an issue as I was anticipating.

Does it sound feasible to have you build the LED units and the driver unit, then have me do assembly here?
That would make the most sense. All I would be doing with the LED units is gluing the LED in with thermal paste and running the wires outside the unit somehow. Those things are all easily within your capabilities. I can solder short wires to the LED boards which you can splice to the longer ones you'll be using after you install them in the LED units.

The XP-G2 has a width of 3.30+/-.13
3.43mm is 0.135"
0.191" on the diagonal

Not sure what kind of packaging you are planning, but could it really fit inside a 0.25" pipe? That would be awesome.
The smallest board on which the XP-G or XP-G2 can be mounted is this one. That precludes using an 0.25" pipe but the next size up should be OK. Am I correct that pipes are sized by ID? It's been a while since I've bought pipe.

This sounds like all I need to do on my end is source the LEDs and drivers, flow solder the LEDs to the MCPCBs, connect wires, and test them with the drivers. Fairly easy project on my end actually. Given how inexpensive LEDs are at this point (a decent bin XP-G2 is under $5), it probably makes sense to make up 5 or 10 extra LED boards in case you need replacements down the road.
 

ddrueding

Fixture
Joined
Feb 4, 2002
Messages
19,729
Location
Horsens, Denmark
Awesome. So there are no adjustments in the driver for the wire length? How about number of LEDs? At the these price points we may as well do them all.

4 Drivers with 2, 3, 5, and 15 LEDs. would finish off the landscape lighting entirely.
 

jtr1962

Storage? I am Storage!
Joined
Jan 25, 2002
Messages
4,374
Location
Flushing, New York
Awesome. So there are no adjustments in the driver for the wire length? How about number of LEDs? At the these price points we may as well do them all.
LED drivers typically have an output voltage range over which they operate. There has to be a range because Vf of white LEDs can vary from 2.8 volts up to as much as 4 volts. This built-in compliance voltage range will take care of any variations in wire length. Electronically, constant current drivers try to keep current to the LED constant by measuring the current and adjusting the output voltage as needed so the current remains at the set value. Because of this, you don't need to worry about voltage drops in the wiring at all.

4 Drivers with 2, 3, 5, and 15 LEDs. would finish off the landscape lighting entirely.
So that's at least 25 LEDs, plus matching drivers. If I recall, the driver we used in your chandelier could accommodate up to 5 LEDs, and I think it would work fine even with only 1 or 2. If so, that takes care of three of the four drivers. I just need to find a dimmable driver which can run 15 LEDs in series.

BTW, under Cree's new rating system if we can keep Tj closer to 25 or 30 Celsius output will be about 10% more than at the rated 85 Celsius. That could be ~155 lumens @ 350 mA. I've little doubt we can easily get 250-300 lumens per LED without serious heat issues.
 

ddrueding

Fixture
Joined
Feb 4, 2002
Messages
19,729
Location
Horsens, Denmark
BTW, under Cree's new rating system if we can keep Tj closer to 25 or 30 Celsius output will be about 10% more than at the rated 85 Celsius. That could be ~155 lumens @ 350 mA. I've little doubt we can easily get 250-300 lumens per LED without serious heat issues.

That shouldn't be an issue. According to this chart, 1/4" "L" thickness pipe would be a near-perfect fit. Maybe close enough to just epoxy in at the right depth. Even 3/8" isn't that expensive, so making each one a foot long would be trivial and should give us plenty of thermal mass and surface area.
 

jtr1962

Storage? I am Storage!
Joined
Jan 25, 2002
Messages
4,374
Location
Flushing, New York
That shouldn't be an issue. According to this chart, 1/4" "L" thickness pipe would be a near-perfect fit. Maybe close enough to just epoxy in at the right depth. Even 3/8" isn't that expensive, so making each one a foot long would be trivial and should give us plenty of thermal mass and surface area.
I could grind down the MCPCBs a bit to ensure they would be under 0.315". A near perfect fit is obviously better thermally here. When all is said and done I'm pretty sure the LED will be close to whatever temperature the ground is.
 

ddrueding

Fixture
Joined
Feb 4, 2002
Messages
19,729
Location
Horsens, Denmark
I'd be tempted to use thermal adhesive, but it does conduct electricity as well. Let me know when you find a driver for the larger chain and I'll send you some money.
 

jtr1962

Storage? I am Storage!
Joined
Jan 25, 2002
Messages
4,374
Location
Flushing, New York
This looks like it might work on the larger chain. I think 350 mA will give enough light. Unfortunately, the driver uses 1-10V dimming, not triac dimming. The dimmer would be wired to the module, so it could be wall mounted same as a triac dimmer.
 

jtr1962

Storage? I am Storage!
Joined
Jan 25, 2002
Messages
4,374
Location
Flushing, New York
I found a better driver. This one works with standard triac dimmers. It should work fine for all of the strings except the one with 2 LEDs. For that I could just add an extra LED in series with the string to get the string voltage past 8V.

Edit: I just noticed minimum order quantity is 50 units. Roal makes other drivers which will work here.
 

ddrueding

Fixture
Joined
Feb 4, 2002
Messages
19,729
Location
Horsens, Denmark
Just an update for anyone following the thread, money sent and parts ordered. Should be 2-3 weeks before an update from my end.

Thanks JTR!
 

ddrueding

Fixture
Joined
Feb 4, 2002
Messages
19,729
Location
Horsens, Denmark
Any recommendations on the glass? I'm thinking something other than glass, but it will need to stand up to constant UV without hazing or cracking too badly. And I'll need to cut them into circles and drill holes in them. Same with the gasket.
 

jtr1962

Storage? I am Storage!
Joined
Jan 25, 2002
Messages
4,374
Location
Flushing, New York
Any recommendations on the glass? I'm thinking something other than glass, but it will need to stand up to constant UV without hazing or cracking too badly. And I'll need to cut them into circles and drill holes in them. Same with the gasket.
Polycarbonate with UV stabilizers added is highly resistant to UV as well as virtually unbreakable. For the gasket, maybe some type of silicone?
 

jtr1962

Storage? I am Storage!
Joined
Jan 25, 2002
Messages
4,374
Location
Flushing, New York
Parts and your check are here. After I flow solder the LEDs to the MCPCBs, I'm going to put a few inches of 24 gauge wire on the LED boards for now to test them. I'm figuring when you wire everything up you can solder whatever gauge wire you want to the short pieces of wire. Does this sound OK?
 

jtr1962

Storage? I am Storage!
Joined
Jan 25, 2002
Messages
4,374
Location
Flushing, New York
I did my own outdoor LED lighting project. I had two 300 watt halogen floodlights in the yard which haven't worked for a while. I decided to mod them with LEDs rather than just replace the lamps. In truth, I wanted to do this a few years ago but LEDs hadn't reached the point where it was cost effective to do so. Also, there weren't any available in 5000K and 90+ CRI. The Cree CXA series changed all that. I decided to mod one to see the results before attempting the other one. I bought 4 CXA 1507s from Mouser at $5.60 each. These were 635 lumens at 85°C, 200 mA, and 37 volts. CCT was 5000K and CRI was 90 minimum, 95 typical.

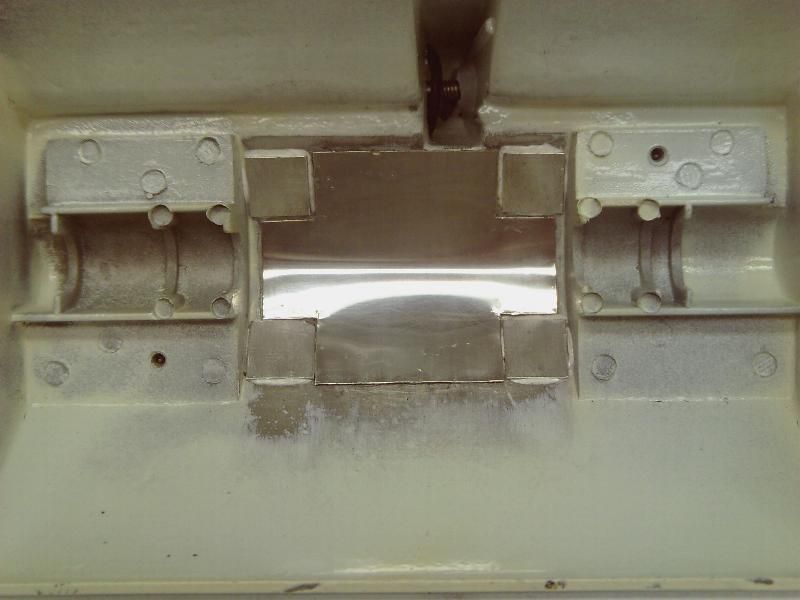
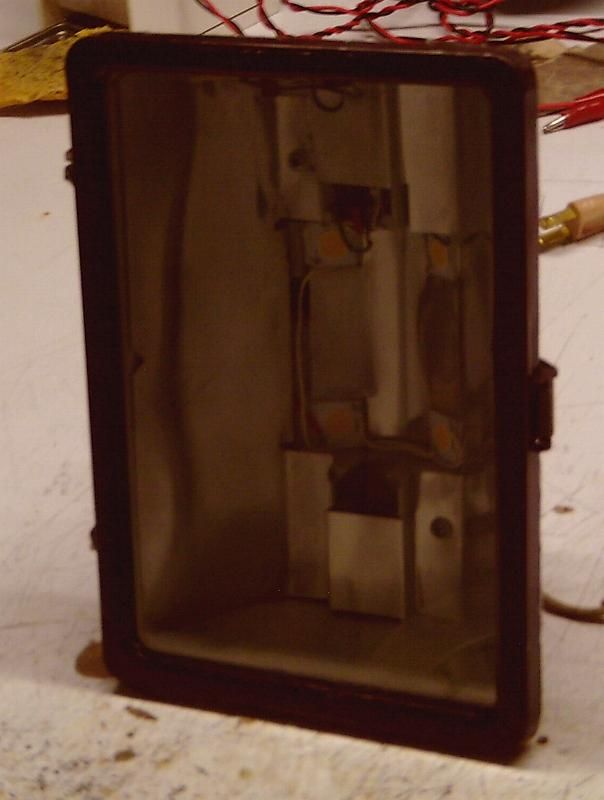
First order of business was to prep the fixture for the LEDs. The inside wasn't flat so I had to make a few pieces of aluminum which were flat where the LEDs were mounted, but which also matched up to the shape of fixture reasonably well. I wasn't aiming for perfection. I figured even if the mismatch averaged 0.1mm, the thermal impedance with thermal epoxy would be on the order of 0.5°C/W. This would only result in a few degrees C higher operating temperature. Here's what I came up with (note that I reused the reflector but cut it to fit around the LEDs):

FixturepreppedforLEDs_zpsf9e8bcbe.jpg


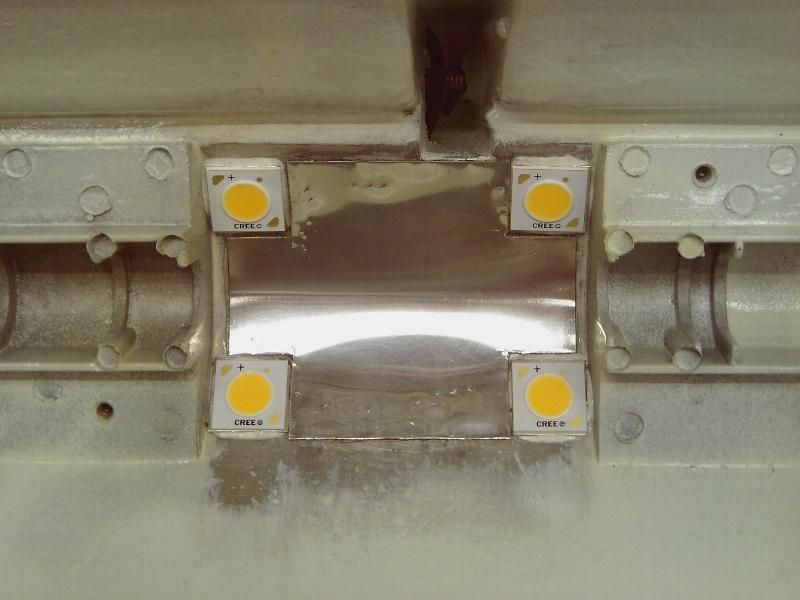
Here are the LEDs mounted:

LEDsMounted_zpsefbf801a.jpg


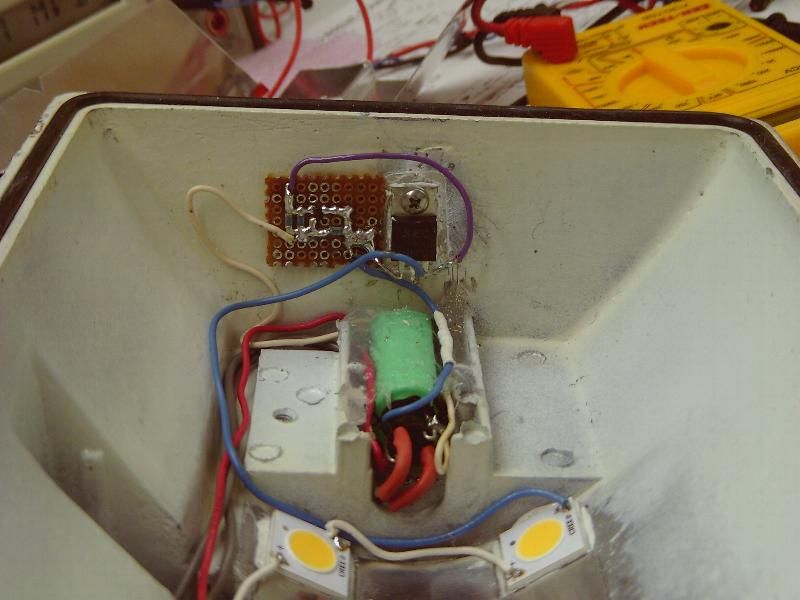
Here is the driver circuitry:

DriveCircuit_zps99ea682d.jpg


This is the finished result:

FixtureComplete_zps1b2257a5.jpg


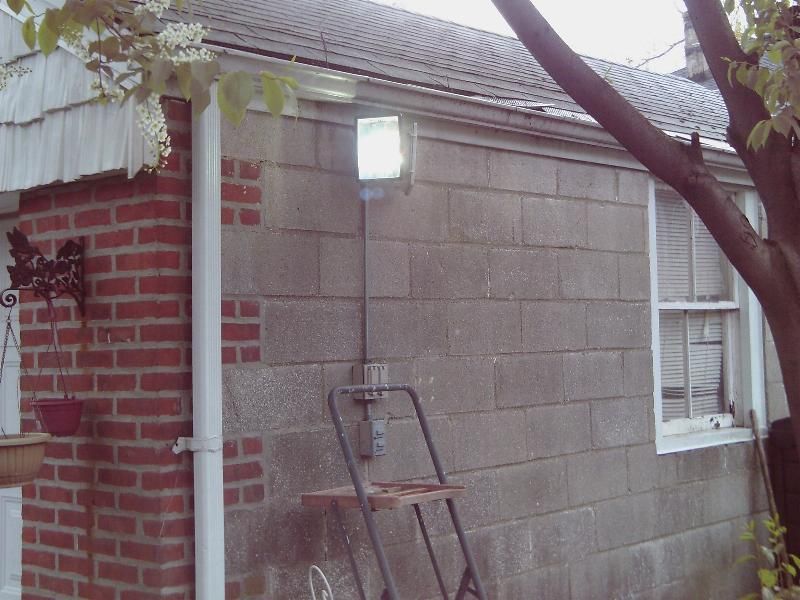
Here it is mounted by the garage:

FixtureInstalled_zps52138377.jpg


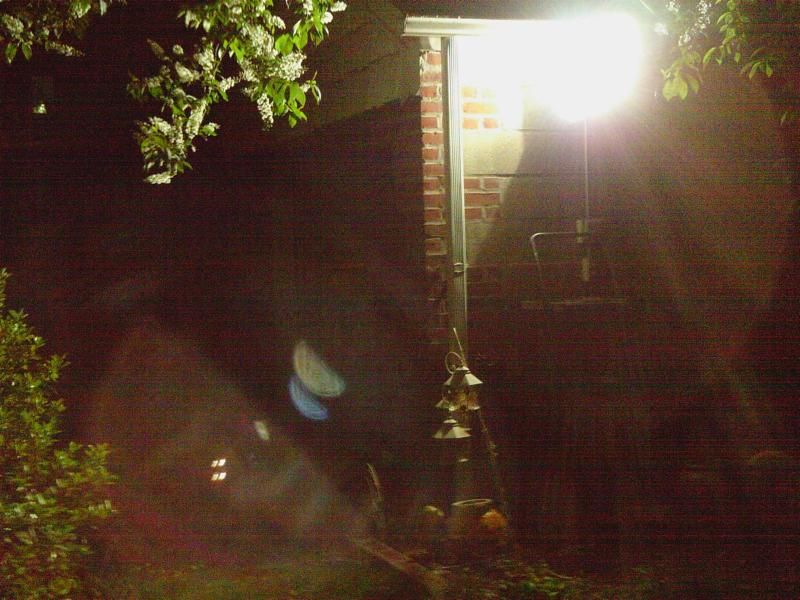
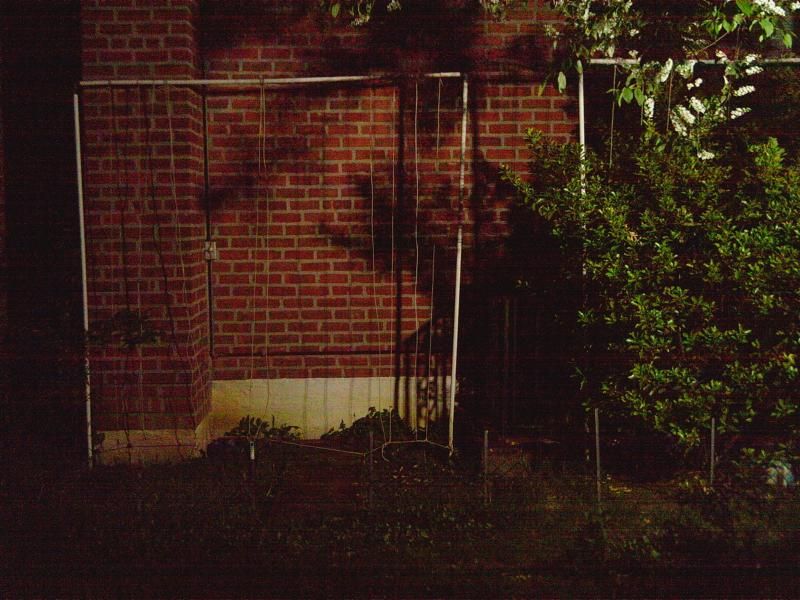
And here are some night views:

YardLitUp1_zpsb980272e.jpg

YardLitUp2_zps0b2c31d0.jpg


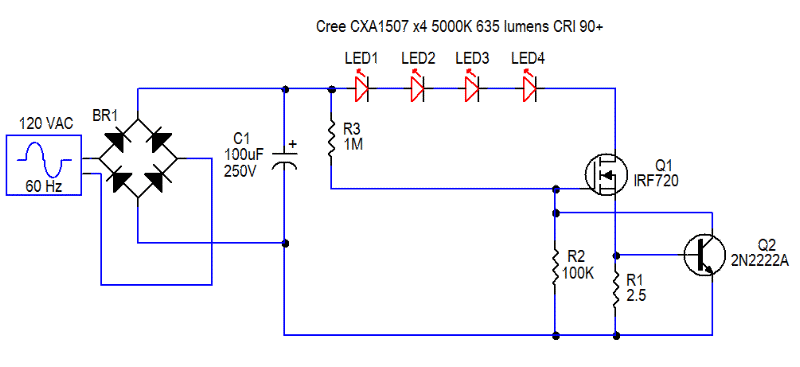
I kept the driver circuit super simple:

CreeCXA1507FloodlightSchematic_zpsae34cf85.gif


Yes, there isn't any isolation between the 120 VAC and the LEDs but I don't plan to have the light running when nobody is around. The nice thing about the CXA1507s (and most of the CXA series) is that four in series come pretty close to the voltage of rectified, filtered 120 VAC. This simple linear drive circuit only burns up about 3 watts of power. It would burn up slightly less with a 68 uF cap instead of 100 uF but the 100 uF was all I had handy. The nice thing about this circuit is Vbe of Q2 decreases with temperature, effectively creating a safety mechanism which reduces drive currents if things get too warm. At normal room temperature the drive current starts at 230 mA when the fixture is cool but this drops to about 210 mA after the fixture warms up. Case temperature of the LEDs is around 55° C. According to the data sheet then, each LED is putting out roughly 685 lumens, and the total fixture output is about 2740 lumens. Power consumption starts at 36 watts but drops to 33 watts, giving an overall efficiency of 83 lm/W-not bad for a high CRI light source. If Mouser had the 730 lumen bin available, efficiency would have topped 95 lm/W. Of course, I could have exceeded 140 lm/W by going with the CRI 70 parts, using 8 pieces, and underdriving them, but efficiency wasn't the main goal here given that these won't be on more than a few hours a day during the warmer months only. I wanted a high CRI light source with decent efficiency. I'm not sure how the light output compares to the original halogen lamps but it seems pretty close to my eyes. The 300 watt halogen lamps at best put out 6000 lumens, but probably only 4000 lumens or less actually makes it out of the fixture.

Anyway, I'm quite pleased with the result. I'll be modding the other fixture next time I order from Mouser. This turned out to be a very effective and low cost (<$25 with all parts) mod thanks to the Cree CXA series.
 

Handruin

Administrator
Joined
Jan 13, 2002
Messages
13,927
Location
USA
I did my own outdoor LED lighting project. I had two 300 watt halogen floodlights in the yard which haven't worked for a while. I decided to mod them with LEDs rather than just replace the lamps. In truth, I wanted to do this a few years ago but LEDs hadn't reached the point where it was cost effective to do so. Also, there weren't any available in 5000K and 90+ CRI. The Cree CXA series changed all that. I decided to mod one to see the results before attempting the other one. I bought 4 CXA 1507s from Mouser at $5.60 each. These were 635 lumens at 85°C, 200 mA, and 37 volts. CCT was 5000K and CRI was 90 minimum, 95 typical.

First order of business was to prep the fixture for the LEDs. The inside wasn't flat so I had to make a few pieces of aluminum which were flat where the LEDs were mounted, but which also matched up to the shape of fixture reasonably well. I wasn't aiming for perfection. I figured even if the mismatch averaged 0.1mm, the thermal impedance with thermal epoxy would be on the order of 0.5°C/W. This would only result in a few degrees C higher operating temperature. Here's what I came up with (note that I reused the reflector but cut it to fit around the LEDs):

FixturepreppedforLEDs_zpsf9e8bcbe.jpg


Here are the LEDs mounted:

LEDsMounted_zpsefbf801a.jpg


Here is the driver circuitry:

DriveCircuit_zps99ea682d.jpg


This is the finished result:

FixtureComplete_zps1b2257a5.jpg


Here it is mounted by the garage:

FixtureInstalled_zps52138377.jpg


And here are some night views:

YardLitUp1_zpsb980272e.jpg

YardLitUp2_zps0b2c31d0.jpg


I kept the driver circuit super simple:

CreeCXA1507FloodlightSchematic_zpsae34cf85.gif


Yes, there isn't any isolation between the 120 VAC and the LEDs but I don't plan to have the light running when nobody is around. The nice thing about the CXA1507s (and most of the CXA series) is that four in series come pretty close to the voltage of rectified, filtered 120 VAC. This simple linear drive circuit only burns up about 3 watts of power. It would burn up slightly less with a 68 uF cap instead of 100 uF but the 100 uF was all I had handy. The nice thing about this circuit is Vbe of Q2 decreases with temperature, effectively creating a safety mechanism which reduces drive currents if things get too warm. At normal room temperature the drive current starts at 230 mA when the fixture is cool but this drops to about 210 mA after the fixture warms up. Case temperature of the LEDs is around 55° C. According to the data sheet then, each LED is putting out roughly 685 lumens, and the total fixture output is about 2740 lumens. Power consumption starts at 36 watts but drops to 33 watts, giving an overall efficiency of 83 lm/W-not bad for a high CRI light source. If Mouser had the 730 lumen bin available, efficiency would have topped 95 lm/W. Of course, I could have exceeded 140 lm/W by going with the CRI 70 parts, using 8 pieces, and underdriving them, but efficiency wasn't the main goal here given that these won't be on more than a few hours a day during the warmer months only. I wanted a high CRI light source with decent efficiency. I'm not sure how the light output compares to the original halogen lamps but it seems pretty close to my eyes. The 300 watt halogen lamps at best put out 6000 lumens, but probably only 4000 lumens or less actually makes it out of the fixture.

Anyway, I'm quite pleased with the result. I'll be modding the other fixture next time I order from Mouser. This turned out to be a very effective and low cost (<$25 with all parts) mod thanks to the Cree CXA series.

That's really neat jtr. I was having a conversation with a friend about something similar where he has a 500W flood light that he was curious about having an LED equivalent. I'm going to point him to your post. This is really well done.
 

jtr1962

Storage? I am Storage!
Joined
Jan 25, 2002
Messages
4,374
Location
Flushing, New York
Thank you, Doug. In truth, this is a relatively easy mod, at least from the standpoint of installing the LEDs. Anyone who is handy could probably do it. The harder part is the driver. However, if I were doing this for anyone but myself, I would probably just use a commercial driver. The trick might be finding something which fits, although 500 watt floods have more space.

What's interesting here is I really wasn't pushing the fixture or the LEDs to their limits. If I wanted to go all out, I might have made larger aluminum plates to spread the heat a bit more, and ran the LEDs to their maximum (or perhaps used 8 instead of 4). Doing those things I'm sure I could have achieved at least 4000 lumens, if not more. If I was happy with a CRI in the 70s, then over 5000 lumens would be feasible. In a 500 watt fixture I've little doubt something like 6000 to 8000 lumens would be within the realm of possibility.
 
Top